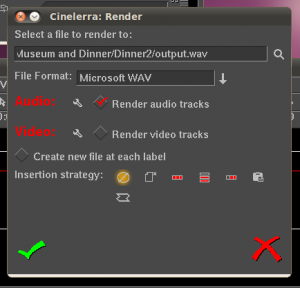
Render from Cinelerra
The rendering of the video will be to a Quicktime for Linux file encoded with AAC audio and MPEG-4 video.
If you’ve been following this guide, you should have a project open with a video track and at least one audio track. Click on the File menu and select Render…. Select Quicktime for Linux for File Format. Check the box for Video and check the box for Audio so that both audio and video will be rendered. For Insertion Strategy, choose None. Select the browse button ![]() and navigate to your output folder, then type output.mov in the file name box. Click the check box to select this location. Click the wrench next to the ‘Render audio tracks’ and choose MPEG-4 audio and click the check box to accept. click the wrench next to ‘Render video trakcs’ and select MPEG-4 Video, Fix quantization with Quantization of 1 and then click the check box to accept. Click the check box again to begin rendering. Cinelerra’s main window will show the progress of the render in the bottom right-hand corner of the screen. Depending on the length of the clip, rendering can take a while.
and navigate to your output folder, then type output.mov in the file name box. Click the check box to select this location. Click the wrench next to the ‘Render audio tracks’ and choose MPEG-4 audio and click the check box to accept. click the wrench next to ‘Render video trakcs’ and select MPEG-4 Video, Fix quantization with Quantization of 1 and then click the check box to accept. Click the check box again to begin rendering. Cinelerra’s main window will show the progress of the render in the bottom right-hand corner of the screen. Depending on the length of the clip, rendering can take a while.

Creating Windows Media Compatible Video Files
This is a common format that should be compatible on any Windows computer starting with XP/2000.
mencoder -oac mp3lame -lameopts br=128 -ovc lavc -lavcopts vcodec=msmpeg4v2:vbitrate=5000 -o my-video.avi output.mov -demuxer mov
If you get an error about not being able to set up the audio codec, try changing the bitrate (br=128) to 64 or even 32. This error message is generally related to trying to output audio in a higher quality than was provided in the input audio (yes, I know that’s dumb). You can change the vbitrate to a higher quality if you wish, but I believe that the highest you can choose is somewhere around 15000 or 16000 (probably a 16-bit integer limitation). If you go higher than this, the quality will be severly degraded. Make sure that you specify -demuxer mov or you’ll get some artifacts and green trash in the output video. This is also the reason why ffmpeg cannot be used to re-encode from the .mov file.
Mencoder has a lot more options regarding video encoding so check out man mencoder for lavcopts. Not all of the options will work with the msmpeg4v2 codec, so if you add options and rendering fails, remove some options until it works again. Most of the options you’ll be interested in have to do with motion estimation and whether you want higher quality or higher compression. Don’t worry about how many options there are, just pick out the ones that say how they affect the quality and which values give the best results and try them. I would give more information, but I’m limited in my knowledge on this – a whole book could be written – and I always end up having to go back and experiment myself since I can’t remember which options to use.
Creating Video for YouTube Upload
Well, I guess we’ve reached the point where you can’t have a relevant article on video unless you tackle YouTube as well. The general command for this would be:
mencoder -oac faac -faacopts br=128 -ovc x264 -x264encopts crf=30:me=umh:subq=9:nr=100 -of lavf -lavfopts format=psp -o my-video.mp4 output.mov -demuxer mov
You may have to lower the bitrate on the audio may need to be reduced to 64 or 32 if you get a codec error. Sometimes I get audio artifacts with this and so I’ll replace -oac faac -faacopts br=128 with -oac mp3lame -lameopts br=128. YouTube will take either, but they recommend AAC audio.
The good news is, this will create H.264 video of good quality for YouTube. The bad news is that mencoder creates broken MP4 files. YouTube will take it (since they’re probably using ffmpeg anyways) but it will not play on a Mac. You can adjust the crf value (quality value) to get higher quality video, but remember that it’s a lower crf value that creates a higher quality. Don’t use a crf value lower than 10 because you’ll just waste disk space. If you want to send HD videos to YouTube of high quality, you should look at YouTube 4:3 HQ and YouTube 16:9 HQ.
Creating Video for Quicktime or .mp4 for Flash Players
To do this, you will need a program called MP4Box. You will have to extract the raw audio and video streams from your generated .mp4 video (see Creating Video for YouTube Upload) and use MP4Box to put it together. Audio must be AAC. You may need to forgo the -of lavf -lavfopts format=psp and generate a .avi file instead of a .mp4 file before doing this. I don’t recall which way is correct.
 mencoder -ovc copy -oac copy -nosound -of rawvideo my-video.mp4 -o video.h264

mencoder -ovc copy -oac copy -of rawaudio input.avi -o audio.aac

MP4Box -fps 30 -new remuxed.mp4 -add video.h264 -add audio.aac
This *should* play on Quicktime. This will also work with Flash players that can play MP4 files.
Note: If your audio is not in AAC format (MP4 audio) you will need to convert to AAC for Quicktime to play the file. You can do this with faacfrom a WAV file:
faac --mpeg-vers 4 -o audio.aac audio.wav
Creating DVD-compliant Files
See the Mencoder Documentation.
Cinelerra
Leave a Reply