OK, I lied. I told you that now you were ready to start using Cinelerra. But you’re not. You still have to get your videos imported into Cinelerra. And if you think you can just click File then Load Files… then you’re in for some disappointment. This has been the single most frustrating obstacle to me for using Cinelerra. It’s probably the reason why many people have never adopted the program. There is a near-surefire way of getting your video content into Cinelerra, but it’s going to require some conversion first. Go ahead and fire up another terminal and cd to the folder that has your video content.
Converting Videos with ffmpeg for Opening with Cinelerra
You need ffmpeg and x264 from source code, and install libfaac (libfaac available with your distribution). Configure x264 with ./configure --enable-shared --enable-pic then make && make install. (You can also specify --prefix=/opt/cinelerra, but you will need to export LD_LIBRARY_PATH=/opt/cinelerra/lib before you’ll be able to use it.) Configure ffmpeg with ./configure --enable-libx264 --enable-libfaac --enable-gpl --enable-nonfree (if you installed x264 in /opt/cinelerra, then you will need to specify first export LD_LIBRARY_PATH=/opt/cinelerra/lib, and then include --prefix=/opt/cinelerra --extra-cflags=-I/opt/cinelerra/include --extra-ldflags=-L/opt/cinelerra/lib with your configure) then make && make install.
That was a lot of work, but now you can run the following:
ffmpeg -i infile.avi -acodec libfaac -ab 384k -ar 44100 -vcodec libx264 -vpre ultrafast -crf 0.01 -f psp outfile.mp4
Cinelerra’s Windows
Cinelerra starts up with a default of 4 different windows. You have the main Program window which shows all of your tracks, the Viewer window which is for previewing clips before adding them to your tracks, the Resources window which has your imported media, arranged clips, effects, and transitions, and finally your Compositor window, which is the main viewing area for Cinelerra output.
Setting up a Cinelerra Project
First, save the project somewhere. It will be saved in Cinelerra’s XML format. You now need to set up the project format to match your video clip. Find the Resources window. The Resources window has several different areas: Audio Effects, Video Effects, Audio Transitions, Video Transitions, Clips, and Media. Select Media. You will see your video media and your audio media.
Right-click your video and choose “Match project size.” Right-click your video again and choose “Match frame rate.” Now your project’s format is set to the size and the framerate of your imported video.
Right-click your audio and choose “Info…” Make a note of your Sample rate and the number of channels.

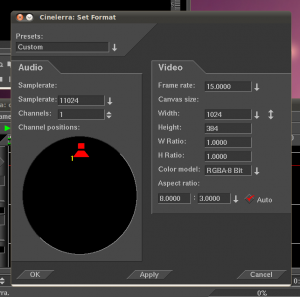
Now go to the Settings menu and choose Format. Here you should enter the Samplerate and Channels for your audio. You can also click on the speaker icons and drag them around to position them for mono, stereo, or surround.

You can also manually set framerate, video size, and aspect ratio in this dialog box.
Click OK to close the Format dialog box. Now that your video is imported and the project is set up, save the project again (you can never hit that save button too much!) and click Next below to see how to start placing your content on the tracks.
Cinelerra
Leave a Reply